Having bought your plot outside the city and decided to build a summer house on it, you will be faced with many questions related to the choice of layout, selection of suitable materials and construction. However, you have one advantage - it is much easier to build a small summer house with your own hands than a solid mansion with a complex layout. Thanks to our tips and step-by-step guides, you can build your own house by choosing a suitable photo of the future structure on the Internet. Such a house will become any vacation spot for the whole family and will not require significant financial investments from you in its construction.
Features and differences of the flight house
As a rule, a summer house is a compact one-story building or a building with an attic floor. However, even a small country house should have all the conditions for a comfortable pastime - a kitchen, rooms, a veranda, preferably a water supply with sewerage. As for the bathroom and shower, when building a country house, which is designed for living in the warm season, you can get by with a separate toilet and a summer shower on the site.
Unlike a full-fledged country house, inexpensive and lightweight building materials are usually used to build a summer house, which can be installed with your own hands without the use of construction equipment. Another advantage of using such materials is the ability to build a shallow, light foundation. This way you can save on both materials and the volume of excavation work.
Tip: for the construction of summer houses, the optimal material is wood. Installation is best done using frame technology.
Country house project

On the Internet you can find many photos of country houses, from which it becomes clear that this building can have completely different dimensions, design and layout. The choice of one option or another depends on the size of the dacha plot, the number of people who will live in the house, and financial capabilities.
If you look at the layout diagrams of summer houses, you will notice that their sizes usually do not exceed 5x6 m or 6x4 m. Larger houses are built for the purpose of year-round living.
When designing and building a country house with your own hands, you should think about its correct placement on the site. When choosing a site for a house, you should observe the following regulatory gaps:
- The building should be located at a distance of at least 3 meters from the border of the neighbors’ territory. From the border of the site, which runs along the street or driveway, the house should be located at a distance of at least 5 meters.
- It is also worth observing fire breaks from residential buildings in neighboring areas. These gaps depend on the materials from which both structures are made. So, between two stone houses there should be a gap of 6 m, between a stone and a wooden house - 10 m, between two wooden houses the distance should be at least 15 m.
- Distances from outbuildings on your site to the house being built are not standardized.
Most often, a one-story building with a veranda or terrace is chosen for a summer house, where it is very pleasant to relax on quiet summer evenings. The veranda or terrace can be open or closed. An attic space is built under the roof of a one-story house, which can be used to store country utensils, garden tools, etc.
If the area of the plot does not allow for a larger structure, and in a small one-story house it is not possible to carve out enough space for all family members, then the best option would be a summer house with an attic floor. In the photos on the Internet you can see how beautiful and proportionate such houses look. At the same time, on the ground floor you can arrange a kitchen and living room, and the attic floor can be allocated for bedrooms for all family members.
Some owners of country houses dream of making a fireplace in it. This product will not only create a cozy family atmosphere on a quiet evening, but also heat the room on cool nights, which sometimes happen even in summer.
Advice: if you decide to make a fireplace with your own hands, keep in mind that you need to lay a good foundation for it. You can build a fireplace out of refractory bricks, but doing it yourself is very difficult. But installing a metal factory fireplace is quite possible.
Selection of materials

At the stage of choosing a layout, it is worth choosing in advance the materials from which construction will be carried out. To build a summer house, you can use the following products:
- The traditional material for building a country house is wood. It is distinguished by its environmental friendliness, ease of processing and installation, and affordable price. In addition, walls made of wood create a favorable microclimate in the room, regulating humidity and saturating the air with healing phytoncides. A wooden house can be built from timber, logs or sheet materials using frame technology. The only drawback of such buildings is their increased fire hazard.
Important: in order to protect a wooden building from fire, rot and damage by insects, the materials must be treated with special impregnations (antiseptics and fire retardants).
- A country house built of brick will cost much more, but it will be stronger and more durable. However, if such a house is heated or a stove is built in it, then the building can be used even in winter. The process of building a brick house is longer and requires you to have the appropriate skills, although if you wish, such a structure is also easy to build yourself.
- Foam blocks and gas blocks can be a cheaper alternative to brick. In addition to its reasonable price, this material has a low specific weight, which makes it easier to transport and install. A house made of aerated blocks is quite warm, but requires external cladding to protect the walls from moisture, since the material is quite hygroscopic. Provided a heating system is installed, you can also live in such a house in winter.
We should also talk about materials for arranging the foundation. Their choice depends on the design of the walls, the type of foundation, geological and climatic conditions in the region of construction. If we are building a house from piece stone materials (brick, foam blocks or gas blocks), then it is better to choose brick, concrete or reinforced concrete for arranging the foundation. So:
- Under a brick house you will have to make a buried monolithic strip foundation made of reinforced concrete. This is the most expensive option for arranging the foundation. The depth of the foundation base should be below the freezing point of the soil.
- For walls made of lightweight materials (aerated concrete, foam blocks and wood), you can install a shallow strip foundation made of monolithic reinforced concrete, a columnar base made of concrete, stone, factory blocks, steel pipes or processed logs.
- On heaving soils and when building on a slope, it is advisable to make the foundation on screw piles. They are made from steel pipes with a helical blade at the end. Pipes can be screwed into the ground manually. The depth of placement is below the freezing point.
As for the materials for arranging the roof, they are no different from those used in the construction of a traditional residential building. Wooden beams are used for the rafter system, the sheathing is made of boards or OSB (in the case of laying soft roofing material). The roof covering can be made of corrugated sheets, metal tiles, rolled flexible tiles, slate, etc.
Construction technology

Since the most inexpensive country house will be a frame building on a columnar foundation, we will describe step by step how to build such a house with your own hands.
- After preparing the site and marking, we dig holes for the pillars. It is worth noting that the pillars are made under all external and internal load-bearing walls with equal spacing (1-1.5 m). The dimensions of the pillar depend on the material from which it will be made. Brick pillars for a frame house can be 380x380 mm in size.
- After digging holes to a level below the freezing point of the soil, a sand cushion is placed at the bottom. A layer of sand 10 cm high is moistened with water and thoroughly compacted.
- Then pillars of the required height are laid out of brick using cement mortar. The outer surface of the posts is plastered.
- The upper horizontal surface of the pillars is waterproofed with two layers of roofing material.
- Next, the strapping beams (beams 150x15 mm) are laid on the pillars. In the corners they are fastened together and fixed to the posts using anchors or steel brackets.
- We attach logs to the frame beams at equal intervals (70 cm).
- Next we install the wall frame. It can be assembled on the ground and lifted onto a beam or erected directly on the harness. The second option is more suitable for doing it yourself. For the frame it is worth taking bars with a cross section of 50x150 mm. In the corners of the house, double bars are installed to increase rigidity.
- We install vertical frame posts at the location of window and door openings, as well as along the entire plane of the walls with equal spacing.
- After this, the upper strapping beam is mounted. Horizontal frame beams are fixed above the window and door openings. In the corners of the house, to increase the rigidity of the frame, oblique struts are installed on both sides.
- Now the frame of the house is sheathed with sheet material (OSB, chipboard, moisture-resistant plywood) or clapboard. In the space between the two layers of sheathing (inside the frame) it is worth laying thermal insulation material (mineral wool, basalt insulation, extruded polystyrene foam).
- Let's move on to the construction of the floor. We attach subfloor boards to the joists on the bottom side. On top of them, going around the logs, we lay a waterproofing membrane. Then we put insulation into the gap between the joists. After this comes a layer of vapor barrier and finished floor boards.
- We install floor beams above the vertical posts of the wall frame. For a tight fit, grooves are cut out on their edges. The beams are additionally fixed to the frame with steel corners.
- Now we are installing the rafter system. We fasten the outer pairs of rafter legs on the ground and mount them on the walls as gables. We connect these pairs of rafters using a ridge beam. After this, you can mount the remaining pairs of rafter legs and install them at equal intervals, connecting them to the frame beams and floors.
- Next, a vapor barrier film is spread over the rafters. It is fixed with brackets and counter-lattice slats on the rafters.
- Next, the sheathing is done and the roofing material is laid.
Owners of suburban areas dream of their own cottages. Country frame houses allow you to get a large living space and implement unusual design solutions.
Projects of cottages for summer cottages can be very different. The appearance of buildings, their interior decoration and the number of rooms depend on a number of factors.
Main types of layouts of country cottages
The layout of the houses depends not only on the wishes of the customer, but also on the region in which construction is planned. As practice shows, in the Moscow region they prefer single living spaces, in the style of studios. In the provinces they prefer classic rooms.
Despite this, all plans have common features. In the vast majority of cottages, the lower floor is reserved for common rooms. There is a living room, kitchen, pantry, boiler room, bathroom and large bedroom.
The second floor contains private rooms and bedrooms. If many people will live in the house, then an additional bathroom is installed on the top floor.
A huge advantage of frame buildings is that redevelopment can be done at any time. This will not cause any special problems, since the house has no main walls other than the frame itself.
For this reason, construction companies easily meet with customers and redo the layout according to their requirements.
Reasons for the popularity of country houses
Important factors for promoting houses can be considered:
- Accelerated pace of construction.
- Affordable price of cottages.
- Complete absence of shrinkage.
- Possibility of quick redevelopment.
- Excellent thermal insulation properties.
- Resistance to seismic shocks.
The combination of these factors has made frame buildings popular throughout the world. In the USA and Canada, more than 80% of all low-rise cottages are built using frame technology and there is no tendency to change the situation in the construction market.
In Russia, the popularity of turnkey frame cottages is only gaining popularity, but there is a trend towards explosive growth in construction. By 2030, more than half of the buildings will be built using frame technology.
Who among us does not dream of acquiring our own garden house made of timber on our summer cottage? Prices for garden houses and photographs for them are presented in our catalog. Until recently, it cost much more to bring your ideas to life. Now our company presents inexpensive turnkey garden houses, all prices include installation at the customer’s site. Everything changed when the Cozy Dacha company presented the technology for constructing garden houses from timber and mini-timber. Buying a garden house from the Cozy Dacha company means giving yourself and your family members a place for comfortable relaxation in the fresh air.
Choosing material for the house
Economy class garden summer houses are made from environmentally friendly and affordable material that is easy to process and install. Wood allows you to create buildings where comfortable And easily be. Throughout their entire service life, economy class garden houses retain a pleasant forest aroma. This has a beneficial effect on the functioning of the human respiratory system, allows you to most effectively deal with various types of stressful situations, and ensures sound and complete rest and sleep. To assess how a garden house will look externally, just look at photos of typical projects in the company’s catalogue. The unique structure of wood opens up extensive possibilities in terms of processing the material. Modern garden houses can be made in various stylistic solutions, and the possibilities in terms of designing the interior space of the building are limited only by the customer’s imagination.
Economy class country houses made of timber
How do garden houses made from economy class mini-timber differ from classic buildings? The use of classical technology for constructing a log house is a rather expensive undertaking, both in terms of time and financial costs. An alternative solution to the problem of erecting an inexpensive house on a site is to create a lightweight structure from mini-timber. The advantages that such a garden house has are only partially conveyed in the photo. Due to their low weight, these garden houses are inexpensive and require minimal time to assemble the structure. An inexpensive foundation on screw piles is suitable for them. The lightness of the construction is given by the mini-timber, which can be considered a unique material. Garden houses made of mini timber made of planed boards with standard width and length parameters. The tongue-and-groove locking system provided on the edges of the boards ensures their reliable fixation to each other. Garden houses made of timber are assembled from kits prepared in the factory. This allows you to significantly reduce the installation time of the structure. The production of a set of panels for a future house is preceded by a design stage, during which the company’s specialists take into account all the features of the area and select the optimal solution for the problem expressed by the client. The profiled board from which log garden houses are made is pre-dried. This minimizes such an undesirable phenomenon as shrinkage of the building during operation.
Garden houses made of mini timber
Before placing an order, it is important to decide on the contractor. All modern companies provide photo samples for a garden house, but the presence of colorful pictures does not always indicate the professionalism of the artist. It is much more important to evaluate the experience in the specialized market, the presence of its own production base and a team of experienced craftsmen. The Cozy Dacha company is pleased to produce a turnkey garden house, deliver it to the customer’s site and carry out installation in record time. Many years of experience allows our specialists to take into account all the features of the territory on which the structure is to be installed, and carry out all the necessary operations in strict accordance with existing technology and with the highest quality.
A frame house is an excellent solution for a country house. This structure can be erected in a short period of time and does not require special construction skills. Today we will talk about how to build a frame house on a site, we will talk about the main stages of construction and mistakes made that are easy to avoid. The design really exists, it was made by hand.
Frame house project
Preparing a frame house project is the initial and most important stage of construction. allows the construction of buildings of different heights and purposes on the site. We decided to build a 6 by 4 light frame house on the site, consisting of one single room, with four windows and a hip roof. Insulation of the house was not provided, since it is planned to be used exclusively in the summer.
You can find it online, or you can draw the project yourself. To develop a project, special programs are mainly used, but if the house does not have complex architectural solutions, you can draw it by hand on a regular sheet of paper.
Project of a frame house on a piece of paper.
The drawing must indicate all the functional parts of the house, such as door and window openings, the roof structure, the thickness of the walls, floors, you can indicate what materials will be used in the work and calculate the approximate cost of construction in order to build a frame house inexpensively.
It is the design drawing that allows you to determine what economic costs will be needed for construction.
Frame house foundation
Once the decision has been made to build a frame house for a summer residence and a rough plan for it has been drawn up, you can begin to select a suitable site for construction. The surface should preferably be flat, then there will be no problems with installing the foundation and installing the floor.
 The logs were treated with protective impregnation.
 We decided to do without a foundation and began building the floor directly on the ground, which was leveled with gravel. This is the first and main mistake when we started building an inexpensive frame house.
 Installation of floor joists on crushed stone.
We built the floor frame from nine 150x50 mm six-meter-long boards, which allowed us to install transverse floor joists without joints along the entire length of the house. In addition, we used two more four-meter boards, which were placed on the end of the log. The distance between the floor joists was 500 mm, which is quite enough for the given thickness of the board and the thickness of the plywood for the floor.
Before thoroughly nailing the floor joists together, you need to make sure that the diagonals of this base are equal to each other. You also need to check the location of the frame house relative to the neighboring fence and. It is important to check the horizontal level of the floor joists that are located on the crushed stone, and if necessary, add it easily.
Despite the fact that a turnkey frame house is considered a fairly lightweight structure and can be built directly on the ground, the foundation of a frame house performs certain functions:
- Evenly distributes loads from the entire structure.
- Ensures the durability of the structure, protecting it from freezing and groundwater.
- Prevents warping and shrinkage during soil movement.
Strip foundation
Before building, it is better to choose a strip foundation for that type of construction. You will spend more time and effort on construction, but you will make the entire structure durable. Strip foundations will be especially in demand if construction is carried out on stable soils.
 Strip foundation on crushed stone.
When constructing a strip foundation, you can organize additional rooms in the basement. If a basement is not planned, then soil remains inside the foundation contour. Please note that the width of the strip foundation should be greater than the thickness of the walls of your frame house.
After the construction of the foundation is completed, the lower frame of the floor is installed, it is done using a beam or board placed on the end. The board is installed around the perimeter of the foundation, or along the perimeter of the future house directly on the ground (as in our case). The joints are connected using nails; the structure can be further strengthened using special metal staples. To enhance the load-bearing capacity of the floor structure, transverse joists are installed.
On a note
The floorboard must be treated with an antiseptic.
When building our house, we immediately started installing the frame, but after framing it is advisable to start installing the subfloor. If the house is planned to be used not only in the summer, insulation material is laid between the joists, then a vapor barrier film, and the last layer is plywood sheets.
Frame of a frame house
A do-it-yourself frame country house has a lightweight structure and a lightweight frame. The frame of the frame house is attached to the floor frame.
 Installation of frame house walls.
 Initially, corner posts are installed; metal brackets can be used for reliable fastening, but we did without using them. The U-shaped frame of the wall is knocked together at the bottom and must be fastened with corner jibs, and only after that it is raised and fixed on temporary supports.
 Power frame of the walls of a summer house.
 To ensure greater reliability of the structure, we attached each corner post with additional jibs at the top and bottom, so they protect the frame house in the photo from loosening. We nailed two corner posts of the frame in each corner together with 100 mm nails.
After installing the main corner posts, you can begin to secure the remaining ones, one each on a four-meter wall and two posts on a six-meter wall. The boards of the top trim along the long wall are fastened together by two beams.
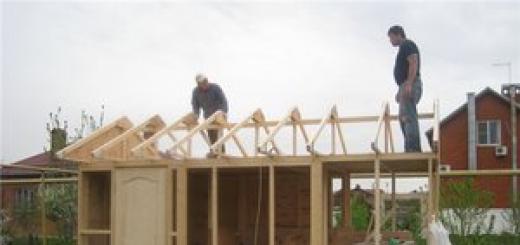
Hip roof
As soon as the main supporting frame of the frame garden house has been erected, you can begin to build the roof truss system.
 Hip roof ridge with central rafters.
 We decided on the type of roof and its slope at the stage of drawing up the design of the future house. A small frame house will have a hip roof, with a minimum slope for that type of roof of 20 degrees. In a hip roof, two slopes have a trapezoidal shape, the other two have a triangular shape.
The frame summer house has a hip roof, which provides additional protection for the entire structure due to the fact that all slopes are inclined.
At the first stage of the construction of the rafter system, the installation of the mauerlat is carried out - a special wooden beam or board, which is installed along the entire perimeter of the frame walls. In this case, we did without muerlat, and distributed the load over the top strapping, which has good rigidity due to the fact that it stands on the end of the board.
 Hip roof power frame.
 At the next stage, the ridge girder is installed, the size of which must be calculated correctly, since it is this component of the roof that bears the main load. The two-meter-long ridge girder and central rafters were assembled on the ground, and only then were they lifted up and installed.
After fixing the ridge girder, they install diagonal rafters, which, like the ridge itself, are made of 150 by 50 mm boards. Diagonal rafters rest with one edge on the ridge, and the other edge on the corner where the top frame of the house meets. All fastenings are made using ordinary metal nails, which does not in any way affect the strength of the structure.
When the power frame of the hip roof is ready, you can continue to build the roof further. The intermediate rafters and outer rafters are attached, which we made from two inch pieces nailed together.
 Hip roof rafter system.
 After installing the rafter system, it is necessary to install the hip roof sheathing. We made it from an inch and began nailing it from the eaves overhang towards the ridge, with the same distance between the sheathing boards.
 Sheathing of the roof truss system.
 A one-story frame house can be covered with a roofing covering and a regular metal profile can be used. This roofing material is easy to work with; it is coated with special substances that protect against corrosion and premature destruction. Other advantages of this roofing material include light weight, affordable cost and a huge range of colors.
Before installing the material, you need to take care of additional protection of the structure. For these purposes, you can use a waterproofing material that is attached directly to the rafter system with metal brackets. But we did not use it for the reason that the frame house will not be insulated.
 Roof made of metal profiles.
 Installation of the metal profile begins from the end of the roof. The main thing is to install the first sheet correctly; the location of all subsequent ones depends on it. The first sheet of metal profile is attached to the ridge girder using self-tapping screws, all subsequent sheets are overlapped with the previous sheets and connected with self-tapping screws.
External cladding of the house
After completing the roof construction, you can begin cladding the frame. In our case, the frame of the frame house was sheathed on the outside with OSB sheets. In this case, only two far walls were sheathed with OSB, one of them was directed towards the fence, and the other to the side. Before the OSB sheets were screwed onto the self-tapping screws, we installed additional 100 mm inch posts.
 Covering external walls with OSB sheets.
 For the summer frame house, we decided to make four large square windows of 1500 mm each, because we wanted more light. We also made the frame for the windows from an inch board; it turned out to be light, because the entire load is carried by the power frame of the garden house made from a 150 by 50 mm board.
 Frame for four windows.
 The two front sides of the frame country house were covered with a block house to add individuality to the structure. Due to the fact that the house was built only on weekends, the block house was immediately treated with a special wood impregnation to imitate mahogany.
 Covering the front wall with a block house.
 In the place where the door is mounted in the house, two racks made of 150 by 50 boards were installed to more securely fasten the door.
 Door trim and installation.
 If you plan to live in a house not only in hot weather, then it is important to insulate the interior walls with mineral wool and waterproof the interior walls after working with the block house. The waterproofing film is attached around the entire perimeter of the interior; it simply covers the opening. After attaching, the film is carefully trimmed and secured inside the window and door opening using a construction stapler.
 Frame house without inserted windows.
 After this, you can begin finishing the frame house with your own hands.
Interior lining of the house
The interior cladding of the house is done using lining. Since the frame garden house was originally planned to be used only in the summer, the walls were not insulated; the frame was simply sheathed with OSB sheets and blockhouse.
 Finishing of internal walls with clapboard.
 To improve the performance characteristics of the structure, insulation is performed. At the previous stage, we already wrote about how to properly lay waterproofing film after installing insulation. Most often, such structures use either mineral wool or ordinary polystyrene foam.
They can be built on a summer cottage; they are made from special panels, the design of which already includes both insulation and waterproofing. The lining is attached on top of the insulation.
Windows and doors
When fixing windows, be sure to leave openings that will be filled with polyurethane foam. If the profile does not have a protective transport film, it is better to paste it around the perimeter with mounting tape; this procedure will protect the structure from expansion of the mounting foam.
 Installation of single-leaf windows.
 Our inexpensive frame house used windows that open to the sides like on a balcony. If you encounter difficulties during installation, it is better to involve specialists in the work. The protection of the room from cold and moisture will depend on the correct installation of window and door profiles.
On a note
The polyurethane foam is carefully trimmed only after it has completely hardened; at the same stage, all protective films are removed.
Laminate flooring
You can begin installing the finished floor only after completing the installation of windows and doors, otherwise air from the street entering the room can cause damage to the floor covering.
 Laminate flooring in the house.
 In our frame garden house, we decided to use high-quality laminate. Laying is carried out on a subfloor made of plywood, on top of which a special sealing material is laid.
Roof insulation with foam plastic
After completing the flooring work, we started thinking about insulating the roof and further increasing sound insulation during rain. This is another serious mistake - it is advisable to complete all the finishing work, including the roof, and only then begin installing the flooring, otherwise there is a high risk of simply ruining the floor.
 Roof insulation with foam plastic.
 We decided to insulate the frame country house with our own hands using polystyrene foam. The foam panels are attached to the rafter system from the inside of the house tightly to each other; if gaps remain, cold air will easily penetrate into the room. It is not necessary to attach a waterproofing film between the roof sheathing and the foam.
 Roof sheathing with OSB panels.
 The foam is covered with OSB panels on top, after which you can begin finishing the roof or leave everything as is.
 Almost finished finishing.
 Today we talked about how to build a frame garden house with your own hands, based on personal experience. Some mistakes were made during the construction process, but they had virtually no effect on the overall functionality of the structure.
The frame house took several years to build, because most of the time was on weekends and only on our own. With such DIY construction, you can count on low prices for frame houses. In our example, you saw that anyone can build a frame house, even without deep construction skills.
Have you always dreamed of your own cozy home on a summer cottage, but for some reason you could not bring your plans to life? A step towards making your dream of country housing come true can be the construction of a summer house, which is ideal for seasonal living.
First of all, you need to purchase and. Its size and location can be any, the most important thing when choosing is your wishes and means. In most cases, people purchase plots that have already been cultivated, but for those who want to develop it from scratch, the option of virgin soil is perfect.
If the site is located in central Russia, then it is recommended to build housing in its northern or northwestern part. This will ensure maximum protection from cold winds and good lighting. In this case, a blank wall, which has a steeper roof slope, should face west or northwest.
Option for location of a summer house on the site
The porch and windows should ideally be directed east or southeast, that is, towards the main part of the garden plot. If you place them on the side of the roadway, then dust will become a permanent guest in your home.
House layout
Many summer house projects are distinguished by their simple layout and lower construction costs, since in them the options for heating and maintaining heat in the winter are not in the first place, unlike private residential buildings for permanent residence.
If you are planning to arrange a place to relax, then the house must have appropriate premises - a room, a veranda and a small kitchen. For those who like to prepare food for the winter, a spacious attic and basement will be simply irreplaceable. In addition, it is worth considering having a storage room for storing various garden equipment and tools.
 Simple layout of a summer house with a veranda (2) and an attic (4)
 When drawing up the layout of a future house, it is necessary to take into account the number of people who will live in it. It is also recommended to link the project to the site according to all its components, including relief, area and wind rose. And, of course, remember about communications - energy supply and water sources.
What is better to build from?
The next stage is the construction of the house structure itself. In most cases, during construction they use. Wood is used as the main material for building walls. Traditional Russian technology involves the use of a log frame - logs laid horizontally and connected at the corners by notches.
 Summer country house made of logs
 It should be taken into account that the logs should extend beyond the corner by approximately 25-40 cm, due to which the structure becomes reliably protected from bad weather. Cobblestone walls, unlike log beams, require less labor and less material used, but require higher quality insulation. If the correct construction technology is followed, it can last more than a hundred years.
More economical frame walls will allow you to get a structure that will be more accessible and optimal. The simplest solution is a small prefabricated summer house, which is built from separate wooden and metal structures.
Where to start drafting a project
In order to get a strong and beautiful summer house on your garden plot, you don’t have to pay a lot of money. You can build it on your own if you carefully study some and the process of compiling them in advance.
 Construction of a simple summer house
 - Consider the maximum number of people who will live in the summer house, as well as their requirements for living conditions.
- Remember that the features of the house design directly depend on the topography and location of your garden plot, the direction of the winds, and the location of the house itself.
- Think about whether it will be convenient and necessary to connect certain communications to the house: sewerage, water, electricity.
- Choose the interior style of your future building. If you want to make some pieces of furniture yourself, then you should acquire the appropriate tools in advance.
- Determine the functional purpose of the building. A summer recreation room can easily do without a cellar and a kitchen, and a house for storing equipment and crops should include utility rooms and a storage room.
 A small house without a kitchen measuring 4x4 m
 Types of summer houses
Garden summer houses differ not only in general characteristics (type of material used in construction, size, type of external decoration), but also in individual features (doors, windows, design of the house itself).
Read also
Projects of gazebos with barbecue and barbecue
 Small summer house project
 Prefabricated summer houses
Any summer resident will undoubtedly be delighted with reliable and complete housing, which, if necessary, can be easily disassembled, transported and quickly installed in a new location. This opportunity is provided by mobile modular structures.
Prefabricated houses are designed for family holidays, have a functional layout and a large area, and can be one or two floors. Such structures require the presence of a kitchen, a rest room, a bathroom, and a technical room. The houses are equipped with everything necessary: heating, ventilation, electricity and air conditioning systems. When creating an interior layout, attention is paid to such elements as a shower stall, countertop, sink, water heater, suspended ceilings, etc.
 Modular prefabricated two-story house
 This prefabricated cozy house can be made very quickly and inexpensively on your summer cottage
Stationary small summer houses
Stationary houses have a longer service life and an increased level of comfort. Wooden country houses are undoubtedly more reliable and comfortable housing for people. In addition, these structures are erected very quickly, since they are assembled from almost ready-made parts.
A summer country house made of wood is a fairly economical type of housing that does not require the construction of a complex foundation. No special finishing work is required here, since the material and, consequently, the structure made from it will be very beautiful and attractive.
 Small summer wooden house
 Summer house with terrace and porch
If you need a summer house, intended mainly for overnight stays for two married couples, you can use an option in which the building has two rooms, each of which has its own entrance. The first room can be accessed through a small covered terrace, which is located on the side of the facade, and the other through the rear porch, which is also located under a common roof.
You can easily use such a house for your own needs, and not just for receiving guests (for example, in this case it will be very convenient to arrange a workshop and a summer dining room). When erecting the walls of this structure, it is recommended to use thin timber, and to cover the roof - soft bitumen tiles.
 An example of the layout of a small 2-room summer house with a terrace
 Project of a house with a summer veranda
When building a summer house with a veranda, you first need to think about the most optimal location for this part of the housing. In most cases, verandas are located along the facade of the building, due to which the front door of the house is inside. The width and length of the structure are selected individually, but the most common are 3-6 m by 2.5 m. The veranda is supported by foundation pillars located under the corner posts of the frame. It is necessary to dig trenches under the posts into which a concrete foundation is laid.
 Summer house with a beautiful veranda
 After completing the construction of the veranda structure, it is time to begin finishing its appearance. Projects of houses with a summer veranda require your own, individual design, which will become the highlight of the entire home. Basically, when decorating a room, various plants and flowers are used, for example, vines or in pots.
Project of a house with a summer kitchen
Arranging a summer kitchen, even with the simplest option, is accompanied by certain monetary costs for construction. In addition, it takes up a lot of free space, which can cause significant inconvenience when it comes to small areas. In this case, universal kitchen areas will be a real salvation, which, if necessary, can be easily converted from a summer option to a winter one. You can achieve the desired result if you equip the kitchen on the ground floor of the building and fence it off with a sliding wall.

This type of room is a simple kitchen, which is combined with the outside space of the house (this will require the installation of glass doors up to the ceiling). Due to hermetic sliding door systems, the interior space of the home can be easily and simply protected from the effects of rain, wind and other bad weather conditions.
Project of a garden house with a terrace
As a rule, garden houses with a terrace are practically complete housing for the summer season. Their designs include all the necessary premises, except the kitchen. From the covered terrace there is an entrance to the hallway, from where you can enter the living room and then the bedroom. The living room can also be used as a dining room.
 Layout of a garden house with a terrace
 During construction, one of the rooms can be equipped with a bathroom, which will make the house even more comfortable and functional.