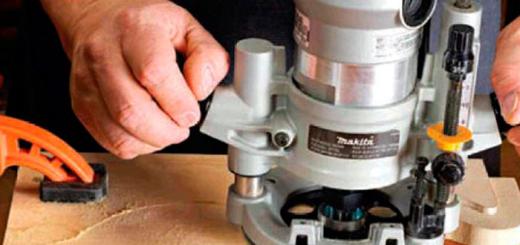
Having a milling machine really simplifies the work of inserting hinges, forming complex holes, recesses, wood carving, etc. But this does not mean at all that it is necessary to have professional and expensive equipment: it is enough to have a simple manual device.
The only thing you need is to be able to basicly handle wood and use power tools. In addition, you need to have a desire, otherwise without this there will never be a result. Those who have no desire to work simply buy furniture or hire craftsmen to, for example, install a new door and cut locks. Any work, especially with power tools, requires certain knowledge, and especially safety precautions.

The milling device is designed for processing both wood and metal. With its help, it is possible to form recesses or holes of any configuration. This greatly simplifies tasks such as inserting hinges and inserting locks. Doing this with a chisel and an electric drill is not so easy, and it takes a lot of time.
There are stationary milling devices and portable (manual). Hand-held electric milling machines are considered universal devices, with the help of which, in the presence of attachments, it is possible to perform operations for various purposes; you just need to change the position of the part in relation to the device or vice versa.
Stationary devices are used in factories or factories where mass production of wood or metal products is established. Under such conditions, the cutting attachment is stationary, and the workpiece moves along the desired path. When using a hand tool, on the contrary, the part is fixed motionless and only then it is processed, although there are parts that require fixing a hand tool. This is provided for in the design, therefore, it is considered more universal. This is especially true when a large number of parts need to be processed, and it is not possible to use a stationary machine.
 A homemade milling machine is a horizontal platform with a hole in the center, to which a hand-held device is attached from below.
 There are many types of milling machines, but for use at home or for starting your own business, universal models are more suitable. As a rule, they are equipped with a set of cutters and various devices for performing various types of operations. The only thing is that if you have a manual milling cutter, simple operations can take much longer than when using a stationary machine.
Using a manual milling device it is possible to:
- Make grooves or recesses of any shape (curly, rectangular, combined).
- Drill through and non-through holes.
- Process ends and edges of any configuration.
- Cut out complex shaped parts.
- Apply drawings or patterns to the surface of parts.
- Copy parts if necessary.
 Copying parts is one of the functions of any electric milling machine.
 The presence of such functions makes it possible to simplify the production of the same type of furniture or the production of identical parts not related to furniture production. This is one of the main advantages of this tool. As a rule, to produce parts of the same type, it is necessary to install copying machines, which are designed to perform only one operation, which is not always profitable, especially in small enterprises.
Getting started and caring for the tool
To understand how this device works, you should familiarize yourself with its main parts and their purpose.
Composition and purpose of main components
A manual milling device consists of a metal body and a motor, which is located in the same body. A shaft protrudes from the housing, onto which various collets are placed, serving as adapters. They allow you to install cutters of various sizes. The cutter is inserted directly into the collet, which is secured with a special bolt or button, which is provided on some models.
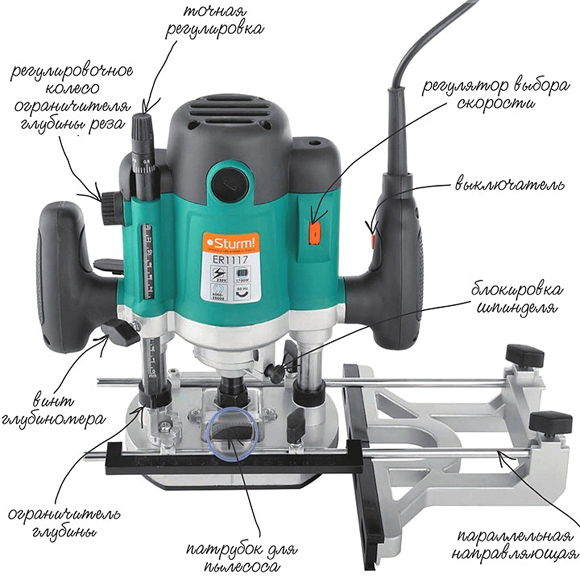 The main elements of a manual milling device and their purpose.
 The design of the milling device includes a metal platform, which has a rigid connection to the body. It is attached to the body by means of two rods. On the outside, the plate has a smooth coating that ensures smooth movement during operation.
The manual milling device has some characteristics that can be adjusted:
- Due to the handle and scale for adjusting the milling depth. Adjustment is carried out in 1/10 mm increments.
- By adjusting the rotation speed of the cutter.
At the initial stages, when mastering the tool, it is better to try to work at low or medium speeds. Although you should always remember that the higher the speed, the better the work. Especially if this concerns critical, visible areas that cannot be masked.
In addition to these levers, there is also a button to turn the product on and off, as well as a lock button. These elements are considered basic, ensuring high-quality and safe performance of work. There is also a parallel stop, which contributes to ease of use. It can be rigidly fixed or with the ability to adjust the shift of the working area away from the center.
Caring for a hand-held milling device

Usually, a factory product falls into the hands of a person tested and lubricated, so no additional measures should be taken. Only during its operation you need to monitor its cleanliness and serviceability. At the same time, it should be regularly cleaned of dust and the lubricant should be changed, if so written in the passport. Lubrication is especially necessary for moving parts. As an option, you can use aerosol lubricants, but you can also get by with regular ones, such as Litol. The use of thick lubricants is not recommended, as chips and dust stick to them. If aerosol lubricants are used, then this factor can be eliminated.
The sole, the smooth part of the body, also requires lubrication. Regular lubrication will ensure smooth movement.
Despite this, the purchased item should definitely be checked for quality of assembly and presence of lubricant.
Unfortunately, not all manufacturers, especially domestic ones, care about build quality. There are cases when, after the very first hours of operation, screws or screws are unscrewed from a product because they were not tightened properly.
Rotation speed adjustment
The operation of any tool is associated with certain conditions related, first of all, to the nature of the material being processed. It can be plywood, composite material or regular wood. Depending on this, the rotation speed on the electrical appliance is set. As a rule, the technical data sheet always indicates the operating parameters of the device, depending on the technical characteristics and characteristics of the surfaces being processed, as well as the cutters used.
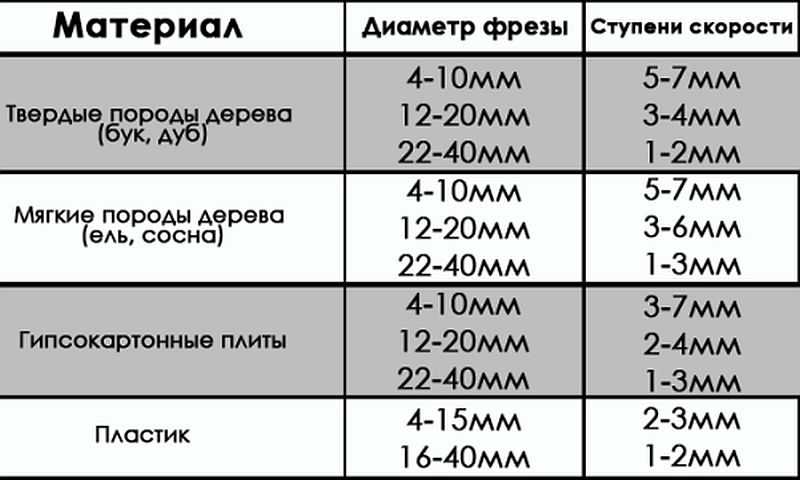 Indicators of processing speeds when using various cutters.
 Fixing the cutter
The first thing the work begins with is installing and securing the cutter. At the same time, you should adhere to the basic rule - all work is performed with the cord plug removed from the socket.
The cutter is installed according to certain marks, and if they are missing, then to a depth of no less than * the length of the cutter itself. How to install a cutter on a specific model can be found in the instructions, which must be included in the technical documents for the device. The fact is that each model may have its own design features and it is not possible to talk about this in the article.
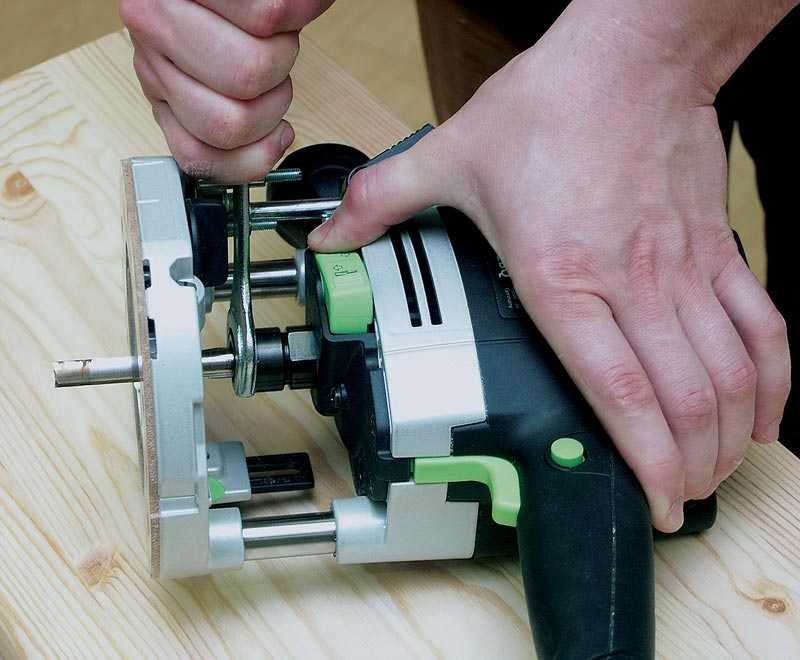 Installing the cutter on the device before starting work.
 There are both simple and more “advanced” models, as they say. Some models have a shaft rotation lock button, which makes installing the cutter easier. Some, especially expensive models, are equipped with ratchets. So it won’t be possible to specifically describe the process of installing the cutter, and it doesn’t make sense, since everyone who is familiar with the operation of such devices will figure it out in a moment.
Milling depth adjustment
Each model has its own maximum milling depth. At the same time, it is not always the maximum depth that is required, but a certain depth that is set before work. Even if maximum depth is required, in order not to overload the device, the milling process is divided into several stages, changing the milling depth in steps. For adjustment, special stops are provided - limiters. Structurally, they are made in the form of a disk located under the bar, on which stops of various lengths are fixed. The number of such legs can be from three to seven, and this does not mean that the more there are, the better. It is better if it is possible to adjust each of the legs, even if their number is minimal. To secure this stop in the optimal position, you should use a lock in the form of a flag.
The process for adjusting the milling depth is as follows:

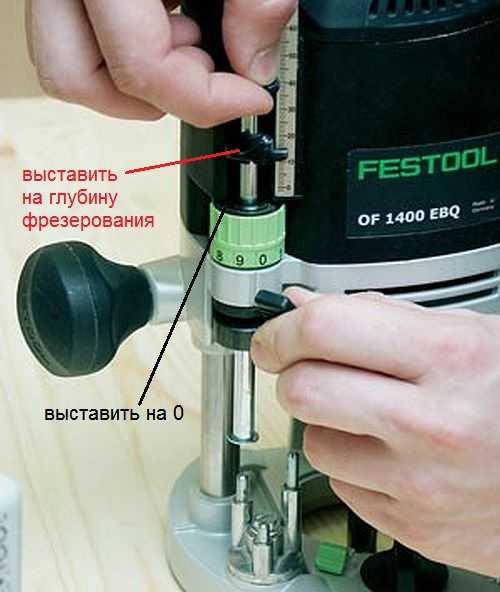 Thus, the workpiece is milled to a given depth.
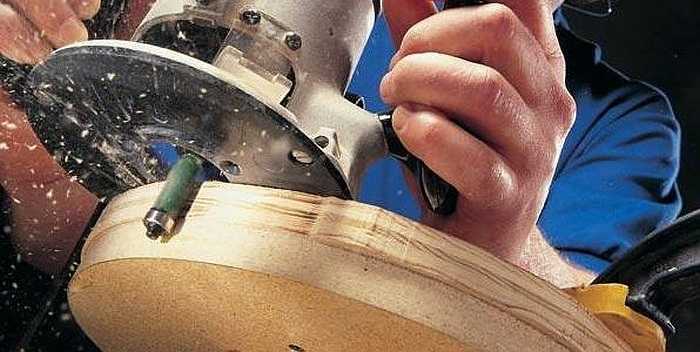
 On high-quality, expensive models there is a wheel for precise adjustment of the milling depth.
 Using this wheel, you can more accurately set the depth without disturbing the previous setting.
 This wheel (green in the photo above) allows you to adjust the depth within small limits.
Milling cutters for hand milling tools

A milling cutter is a cutting tool that can have an intricately shaped cutting edge. As a rule, all cutters are designed for rotational movements and therefore have a cylindrical shape. The shank of the cutter, which is clamped in the collet, has the same shape. Some cutters are equipped with a thrust roller, so that the distance between the cutting surface and the material being processed remains constant.
Milling cutters are made only from high-quality metals and their alloys. If you need to process soft wood, then HSS cutters will do, and if you need to process hard wood, then it is better to use cutters made of harder HM alloys.
Each cutter has its own technical characteristics, which provide it with high-quality and long-lasting performance. The main indicator is the maximum speed of its rotation, which should never be overestimated, otherwise its breakdown is inevitable. If the cutter is dull, you should not try to sharpen it yourself. Sharpening of cutters is carried out using special, expensive equipment. After all, you need not only to sharpen the cutter, but also to maintain its shape, which is no less important. Therefore, if for some reason the cutter becomes dull, it will be cheaper to buy a new one.
The most popular cutters
There are cutters that are used in work more often than others. For example:

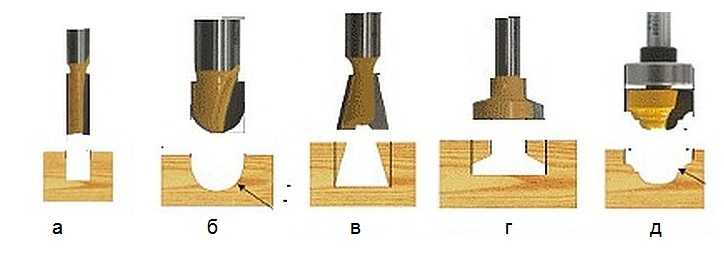 Groove molds are designed to create recesses in any location on the workpiece.
 There are cutters that are simple, monolithic, made from a single piece of metal, and there are typesetters. Set cutters consist of a shank, which serves as the basis for a set of cutting elements. By selecting cutting planes and installing them on the shank, using washers of various thicknesses, you can form an arbitrary relief on the surface of the workpiece.
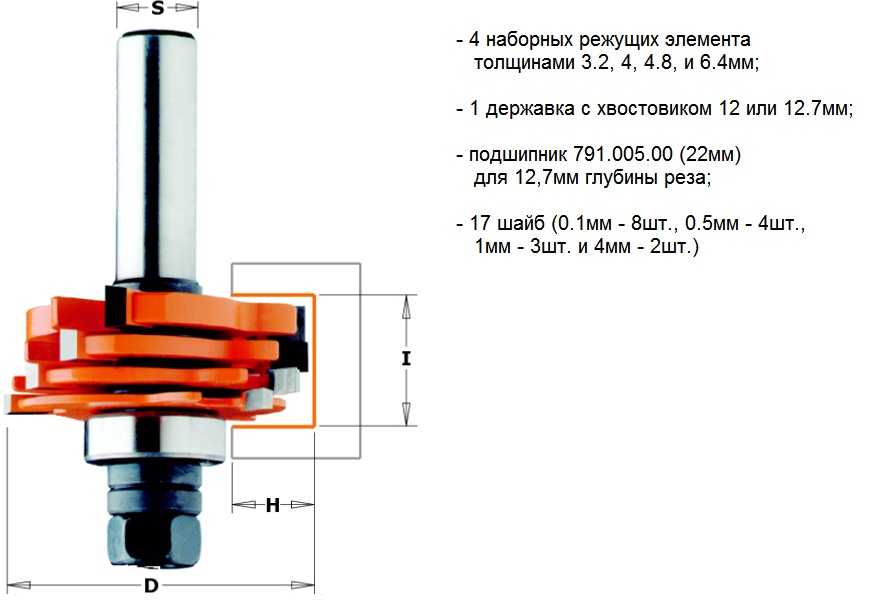 A set cutter is a set of cutting surfaces and washers that allows you to assemble a cutter of the desired shape.
 In fact, there are a lot of cutters and this is only a small fraction of what is produced. All cutters differ in the diameter of the shank, the diameter of the cutting surfaces, their height, the location of the knives, etc. As for manual milling equipment, it is enough to have a set of five of the most common cutters. If necessary, you can purchase them at any time.
Rules for working with hand milling tools
Working with power tools requires special rules, especially when there are rapidly rotating elements. In addition, as a result of work, chips are formed that fly in all directions. Despite the fact that most models are equipped with a protective shield, this does not fully protect against the flow of chips. Therefore, it is better to work with such a tool wearing safety glasses.
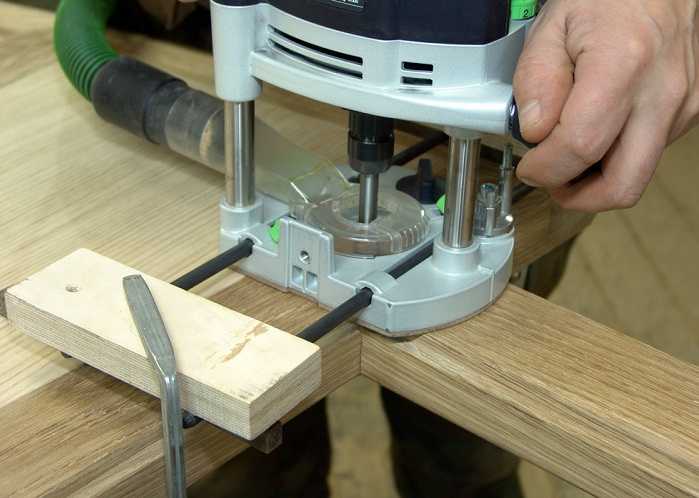 The photo shows a model where a vacuum cleaner is connected to remove chips.
 General requirements
If you follow the basic requirements for safe work with an electric hand router, the end result will please you with the quality of work and a safe outcome. These are the conditions:

The requirements are not very complex and quite feasible, but to ignore them means putting yourself in danger. And one more thing, no less important, is the ability to hold a milling tool in your hands and feel how it works. If serious vibrations are felt, then you need to stop and analyze the reasons. It is possible that the cutter is dull or there is a knot. Sometimes it is necessary to correctly set the rotation speed of the cutter. Here you can experiment: either add speed or reduce it.
Edge processing: using templates
It is better to process the edges of a wooden board using a surface planer. If this is not possible, then you can use a hand router, although this will take some time. These works are carried out both without a template and with a template. If there are no skills or very few of them, then it is better to use a template. For processing edges, straight edge cutters are used, both with one bearing at the end of the cutting part and with a bearing at the beginning (see photo).
 Edge cutters.
 You can use an already processed board or other flat object as a template. Moreover, the length of the template must be greater than the length of the workpiece, both at the beginning and at the end of the workpiece being processed. This will avoid unevenness at the beginning of the edge and at the end. The most important thing here is that the template or object acting as a template has a smooth and even surface. In addition, its thickness should not be greater than the gap located between the bearing and the cutting part.
The width of the part is less than the length of the cutting part
Moreover, the longer the cutting part, the more difficult it is to work with the tool, since more effort is required. In this regard, it is better to start working with cutters that have an average length of the cutting part. The operating principle for edge processing is as follows:
- The template is attached so that it is at the desired height and has a flat horizontal surface.
- The template is firmly mounted to a table or other surface.
- The cutter with the roller is installed so that the roller moves along the template, and the cutter (cutting part) moves along the workpiece. To do this, perform all the necessary manipulations with the template, workpiece and tool.
- The cutter is installed in the working position and clamped.
- After this, the tool turns on and moves along the template. In this case, you should decide on the speed of movement, which is determined by the depth of processing.
- The milling unit can be either pushed or pulled, depending on what is convenient for you.
After the first pass, you should stop and evaluate the quality of the work. If necessary, another pass can be made by adjusting the position of the tool. If the quality is satisfactory, then the clamps are removed, freeing the workpiece.
Using this approach, it is possible to remove a quarter along the edge or in some of its parts. This is done by setting the cutting edge so that it extends to the required depth into the part.
 Quarter shot on a furniture façade.
 If you replace the cutter with a shaped one and move the guide, as well as use a stop, you can actually apply a longitudinal pattern to the part (pictured below).
 Applying a longitudinal figured pattern to the workpiece.
 If you use a similar milling technique (with a template), you can easily master the technique of working with wood in general. After some time, you can abandon the templates, since installing them takes a lot of useful time.
 How to make a straight edge without a template: you can’t do this without experience.
 The width of the part is greater than the length of the cutting part
Quite often, the thickness of the workpiece is greater than the length of the cutting part of the cutter. In this case proceed as follows:
- After the first pass, the template is removed and another pass is made. In this case, the template will be the already processed part. To do this, the bearing is guided along the machined surface. If the cutting part was again missing, then another pass will have to be made.
- For final processing, you should take a cutter with a bearing at the end, and the workpiece should be turned upside down, after which it is secured with clamps. As a result, the bearing will move along the machined surface. This approach makes it possible to process thick parts.
 The bearing is guided along the machined surface, and the cutting edge processes the rest of the workpiece.
 In order to master the work of a hand milling tool, you will need a lot of rough blanks, which you don’t mind throwing away later. No one succeeded the first time. To achieve anything, you need to train hard.
Achieving Various Shaped Edges
If a figured edge is required, which is most likely necessary, then first pay attention to the condition of this edge. If it is uneven, then you will have to level it and only then begin to form a curved edge by selecting the appropriate cutter.
 Rounded edge.
 It is necessary to prepare the surface so that the cutter does not copy the curvature along which the roller will move. In this case, a sequence of actions is needed, otherwise a positive result will not work.
If you need to process a frankly curved surface, then you can’t do without a template. It can be cut from plywood, about 10 mm thick, by first applying a pattern and cutting out the template with a jigsaw. The edge of the template must be brought to perfection using a hand router.
Using plywood can save money and make furniture easier to make, but there are issues that need to be addressed with greater care. For example, the difficulty of sawing sheets into blanks without chipping, masking visible ends, etc. However, these problems can be solved, which will be discussed in the article.
Sawing to size
It's best to start with the largest pieces and consider the grain direction of the outer layer. Drawing up a cutting diagram ( photo A) will not take much time (especially for large products), but it will help you get rid of the purchase of additional material. In addition, by looking at the diagram, you can understand which cuts should be made first.
When drawing the cutting diagram, put down the dimensions and make sure that the parts fit on the sheet. Also allow sufficient finishing allowance.

To prevent chipping on both faces of the plywood, score the bottom face with a disc raised approximately 1.5 mm. Then raise it to its full height and make a gash.
You can make any cuts on a table saw as long as the plywood is face up. In this case, the lower side tends to chip. If both sides must be free of chips, then first make a scoring pass ( photo B And rice. 1a).


Although the factory edge of a sheet of plywood is fairly straight, it needs to be filed using a straight edge to remove any possible defects. Therefore, when you first cut, give a small allowance, and then come back and saw off the factory rib ( rice. 1).
When working with a manual circular saw, the plywood should be laid face down. Place a full sheet of plywood on a sheet of foam (Fig. 2) - due to it, it is more convenient to handle plywood; the sawn piece does not fall and at the end of the cut does not tear out the face veneer.
There are times when it is necessary to use a stationary circular. To avoid chipping at the end of the cut, use the two-pass method. After feeding the part into the machine by 50-75 mm, expand the panel ( rice. 3) and make a full pass.
Grooves
Depending on the size of the part, grooves are selected using a tabletop circular saw or a router with a guide ruler
Aligned slots. Clamp the two panels to the workbench. The faces on which the grooves are to be selected face each other. Use a router to select both grooves in one pass.

In this template, a series of grooves of increasing width are selected and each one is marked with which disk it was cut with. Now it is easy to set the groove disc according to the thickness of the plywood.
Gauge for selecting a disk for grooves for a table circular saw ( photo B) consists of two glued blocks of 20 mm plywood with a number of cut grooves of different widths.

Guides with double rulers. The groove on the plywood is selected using two guide rulers ( rice. 4). The exact distance between the guides is determined by cutting plywood ( rice. 4a), To rout a groove, move the router along one fence guide and then back along the other fence.
Masking the ends
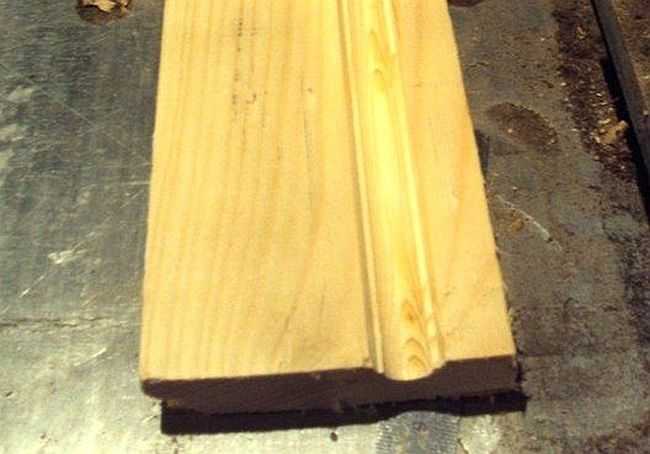
Typically, hardwood strips 6-20 mm wide are used for edging the ends. Make edging strips slightly thicker than plywood ( photo G), and after gluing, trim them flush.


To help hold the trim on the edge of the plywood, you can cut a mortise and tenon (top photo) or use a fiberboard dowel (bottom photo).
The more clamps are used to press the edging, the less chance there is for cracks to form. Ideally, clamps are installed in increments of 100-150 mm, but on large products, for example, cabinets, this is not always possible. In this case, use a wide clamping block ( rice. 5). The wider the block, the further the clamps can be spaced. In addition, the pressure block protects the front side of the edging.


When there are not enough clamps even when using wide blocks, there are several options for screeding. One of them is to modify the clamping block by making one edge slightly convex ( rice. 6) - the force is first applied in the middle between the clamps, and then distributed to the sides. Another way is to insert oppositely directed wedges between the pressure block and the edging ( rice. 7).

If there is a local gap, additional force can be applied using a C-clamp and wedge.
If the edging does not want to be pressed in a certain place, use a C-shaped clamp with spacers (so as not to damage the edging) and a wedge ( photo D).


Sometimes the problem is not the number of clamps, but that they are too short. In this case, press the support bar across the panel and attach the main clamps to it ( rice. 8).
Most tube and rack clamps apply force too high, causing the frame to twist out ( rice. 9a). Use a pressure block with rounded edges ( rice. 9) - this will redistribute the force so that it is applied in the middle of the edging.
Sometimes you have to attach the trim after assembling the case. It must exactly match the thickness of the plywood and be level. In this case, use guide blocks and packing tape to align and secure the edging ( rice. 10).


When planing or sanding flush edging, apply tape to the plywood to avoid damaging the veneer.
Trimming the edging. Trimming is performed with a stripping block ( photo E) or with a hand plane ( photo F). To avoid damaging the veneer, use a strip of adhesive tape.


Sometimes the edging is trimmed using a router with a flush cutter. The cutter bearing tracks the face of the plywood. A stable position of the router base on the edge of the plywood is necessary. To do this, press a 50x100 mm board flush with the top edge of the edging strip ( rice. eleven). On the board you need to select a fold ( rice. 11 a).
When processing identical panels, for example the side walls of a cabinet, press them together using a 50x100mm spacer ( rice. 12) to provide good support for the router. Move the router counterclockwise, and if there are grooves in the panel, temporarily seal them with inserts ( rice. 12a).
Device ( see fig. and photo) is a wide base to which a ruler is attached with glue and screws. To cut the base to size, a hand-held circular saw is run along one edge of the ruler, and a router along the other. (Note: A ø10mm straight bit was used for this guide.)


When the base is trimmed, a auxiliary ruler is obtained that will show exactly where the cut should be made. Simply press the ruler into place and align its edge with the marking line,
If you need to mill a groove wider than the diameter of the cutter used to cut plywood, you cannot simply replace the cutter - you will have to change the position of the auxiliary ruler. Instead, make a second identical guide straight edge and rout the groove in two passes ( rice. 4).
Assembling parts made from plywood is not much different from assemblies made from solid wood - you need to tighten the parts tightly across their entire width. But when you sandwich a row of shelves between two side walls, you can't pull most of the panels together in the middle.

To hold a large assembly of plywood in place when installing clamps, use a square block with grooves cut in the middle.
To tighten the assembly tightly, use 50x100 mm boards with a convex edge ( rice. 13) - the bend directs the clamping force first to the middle of the panel, and then, when tightening the clamps, distributes it to the sides.
Another problem arises when inserting slightly curved panels. The solution is to press the thick stiffener and straighten the curved panel during assembly ( rice. 13a). When the glue hardens, the panel will remain straight even after removing the stiffener.

Prices for milling plywood
| 3-6 | 45 | 30 | 25 | 22 |
| 7-10 | 53 | 38 | 32 | 27 |
| 12-20 | 60 | 45 | 37 | 30 |
| 21-24 | 76 | 67 | 52 | 38 |
| 27-30 | 95 | 83 | 65 | 47 |
| 35-40 | 120 | 107 | 94 | 83 |
Cost of additional services
Plywood milling equipment
The company's fleet includes 2 new high-precision milling machines with 2x4 meter work tables. The machines are capable of cutting plywood sheets with an accuracy of 0.03 mm. The control of the machines is fully automated and is performed by controllers with numerical control (CNC). The machines are equipped with 3 kW water-cooled spindles and rotation speeds of up to 24,000 rpm. The kinetic energy they generate is sufficient to mill plywood up to 70 mm thick at comfortable speeds. The portal and frame are made of steel profile 9.5 mm thick. The high mass of parts dampens any vibrations that occur. The cutting tool feeds smoothly without jerking or vibration. With correctly selected speed settings, we get an edge without chips, burrs and burning. The additional option Tool sensor sets the spindle to “0” along the Z coordinate, automatically determining the thickness of the workpiece on the work table. A nice little thing that saves order fulfillment time.
Photo report from production
Properties of plywood
Plywood is an inexpensive universal material that combines the lightness and warmth of wood, a beautiful natural texture, low cost and ease of processing. The popularity of plywood is constantly growing, largely due to the high environmental friendliness of the material.
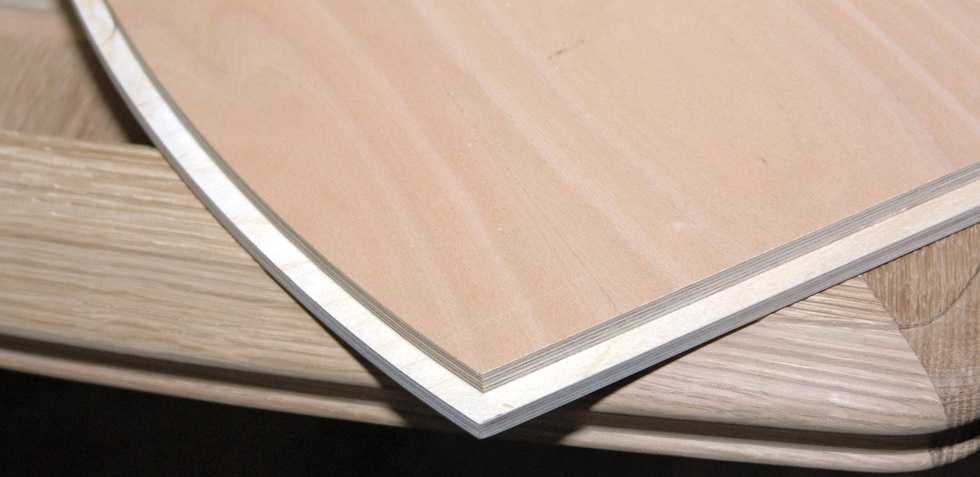
Texture of birch plywood and softwood plywood
Plywood lends itself well to milling. It is used to produce a wide range of parts and components for construction, furniture production, advertising and art objects, lamps, garden tools, etc. Birch plywood is the most popular. Unlike softwood plywood, it has an even color and a soft, attractive texture. The most common types of impregnation are FC, FSF. The first is exclusively for interior work. The second type of impregnation makes plywood partially resistant to moisture and temperature changes.
Features of plywood milling
Milling plywood cutting on CNC machines makes it possible to produce parts of almost any complexity, in any quantity, at a minimum cost of launching a batch.
Plywood is used in the production of decorative partitions
Since the cutting tool (cutters) has a diameter of 3 or 6 mm, milling cutting imposes certain restrictions on the complexity of the layouts and the shape of the parts produced. For example, in the process of milling internal corners, an effect appears that is called radius - the internal corners are not sharp, but smoothed. Radius can become critical if it appears on important structural elements, such as spikes, and will subsequently interfere with the correct assembly of the product. In most cases, the radius is compensated for by additional samples. The thickness of the cutters makes it impossible to use plywood milling for the production of small souvenir products. In this case, it is necessary to use laser technologies that do not have this disadvantage. In all other cases, when the quality of small parts is not critical, milling remains the most optimal way to cut plywood.
Pashtet-
- From: Lip
Good afternoon.
We cut plywood (6, 10, 18mm) with 6mm cutters, the problem is that they break quite often, this does not depend on hitting a knot or the price of the cutters, it can break out of the blue (there is not a lot of play, it doesn’t break every day , but it usually doesn’t reach the point of dulling the cutter - it breaks faster than dulling, and it can work for a week, but sometimes 2 pieces break in a day).
The speed is scanty, the depth per pass is no more than 4mm.
Now we are cutting with a 6mm cutter, maybe 8mm (or even thicker) would be better? (I understand that the logical answer is to take it and try it, but buying a couple of them and a collet so as not to use it later is not entirely correct). Will there be a greater load on the iron (compensating for the breakdown of the cutter with the iron of the machine)?
Thank you very much in advance.
OFFLINE Lodochnik
Lodochnik
- Gender: Man
- From: Korolev
What kind of machine do you have, as well as cutters and operating modes? I work with plywood a lot, no problems. 6th cut 10mm plywood in one pass at a feed of 6-8 m/min. I cut small parts D3.175, feed up to 4m/min, depth per pass up to 5mm. With this cutter I cut plywood up to 18mm thick. The first assumption is overheating of the cutter due to high speeds and low feed, unless, of course, the mechanics of the machine are rigid and have no backlash.
Regards, Oleg.
OFFLINE -Pashtet-
Pashtet-
- From: Lip
The machine is Chinese with a field of 1.2x2.5, a 2 kW spindle, Gravman cutters (for ~300 rubles and for ~700-900 rubles).
Our feed is 11, with a depth per pass of 4, rpm 15,000 (maximum).
No, the cutters probably overheat, they are not burnt (sometimes they get dirty, but this is 1 in 1000, usually there is no carbon deposits at all, they are clean and shiny, they do not get hot).
OFFLINE Crazydox
Crazydox
- Gender: Man
- City: Velikiy Novgorod
- Interests: Everything is interesting.
- From: Veliky Novgorod
What kind of machine do you have, as well as cutters and operating modes? I work with plywood a lot, no problems. 6th cut 10mm plywood in one pass at a feed of 6-8 m/min. I cut small parts D3.175, feed up to 4m/min, depth per pass up to 5mm. With this cutter I cut plywood up to 18mm thick. The first assumption is overheating of the cutter due to high speeds and low feed, unless, of course, the mechanics of the machine are rigid and have no backlash.
Be kind! Can you tell me what mode of cutting plywood (21 mm) with the ONSRUD 48-007 cutter?
OFFLINE ult1
Ult1
- From: Kaluga
I’m looking for a forum asking about the parameters for cutting 10-15mm plywood and 18mm softwood furniture panels (I haven’t found what I was looking for yet, I’ll be grateful for your answer), a Kvikovsky Kvalitech router with a 2.2 kW spindle 24000 rpm, so I’m cutting 3.175 single-flute compression and single-flute with removing the chips downwards (the first half) the parameters with which I am working at the moment: depth per pass 4mm, 15000 revolutions, feed 2000 (I haven’t figured out how it is measured yet, work speed is written on the chipboard control panel), and the rest of the parameters from the chipboard control panel are generally dark wood fastspd 5000 and spdscale 0.500, so sawing cuts but leaves pile that is not so easy to remove manually, what should I change? Settings? Milling cutters? Hands?
OFFLINE yaso73
Yaso73
- Gender: Man
- City Novosibirsk
- Interests:
- From:Novosibirsk
material
ONLINE lkbyysq
Lkbyysq
- Gender: Man
- City: St. Petersburg
- From: St. Petersburg
what should I change? Settings? Milling cutters? Hands?
In my amateurish opinion, the cutter is to blame in your case. Well, the feed rate is 2000, and even with a coefficient of 0.5, a total of 1000 mm/min is not enough even for a triple.
The surest way.
And be sure to read the lectures on “processing of materials by cutting.”
OFFLINE ult1
Ult1
- From: Kaluga
As always, first take a new cutter. I cut with a universal two-start six. I heard somewhere that the tree likes high speeds - so I set it to 21000. I never bothered with the feed - as long as it didn’t break or hurt my ears. I never had any complaints about the end.
In my amateurish opinion, the cutter is to blame in your case. Well, the feed rate is 2000, and even with a coefficient of 0.5, a total of 1000 mm/min is not enough even for a triple.The surest way. Set the speed to maximum. Increase the feed until the cutter breaks.
And be sure to read the lectures on “processing of materials by cutting.”
My cutters are relatively new (I bought them from djtools last week), the only thing for some reason is that on one of them (which I was cutting in principle, a piece of the shank broke off, about 4 millimeters inside the collet (edges), it was pulled too tight during installation?) and these settings were recommended by the company I bought it from cutters (and cutters as well), before that I cut with a 2-start regular cutter that came with the machine (three), and the settings were slightly different: the spindle was working at maximum, and the feed was only 1000, naturally after the first cut I saw it was very slow I began to increase the speed with each workpiece, reaching 5000, the first cutter grunted (broke off), after which I decided that it was better not to experiment because 1 cutter of threes left! and there was only one six in the set!
I cut letters, words, numbers are decorative and therefore the six is too big (I only use it for sampling and then trusting the parameters that are written in the artcam (the maximum depth for a 6mm cutter is 2 mm (and according to this it takes a long time to make a sample)) the immediate question is how deep to cut with the six (two-way) (by the way, I got it burnt!)?
And describe the parameters for the remote control in more detail! Which parameter, besides feed, is responsible for what? Should I just change the feed rate or change the coefficient too (if I change it, by how much)?
I basically came from plywood and wanted to switch to panels because it looks more interesting and tastier! but it won’t be possible to leave completely because... clients are different, requests and needs are also different! And this is why we need to fight somehow!?
OFFLINE Lodochnik
Lodochnik
- Gender: Man
- From: Korolev
To get started, you can adhere to the following regimes. Revolutions are 15t - 18t, working feed (in m/min) is equal to the cutter diameter (in mm), the depth per pass is also equal to the cutter diameter.
The remote control uses something specifically to quickly change the working feed rate during the cutting process. Those. Using the U- and U+ buttons, you change this set during the cutting process, and the real feed speed is calculated as the product of the set by the working feed value specified before starting the NC program (the first line is work speed).
Regards, Oleg.
ONLINE lkbyysq
Lkbyysq
- Gender: Man
- City: St. Petersburg
- From: St. Petersburg
At what depth should I cut the six (two-way) (by the way, it got burnt on me!)?
Have you read the lectures on cutting?
OFFLINE ult1
Ult1
- From: Kaluga
A break in the shank in the collet usually occurs if a step has formed in the collet (from excessive force when tightening), and the shank is inserted deeper than the step. Regarding the pile at the ends, use a counter cut when choosing a strategy. I often don’t get a perfectly clean end on pine; I don’t like working with pine at all. The best cutting is obtained when using compression cutters, then there are no chips and no fringes on the top/bottom of the edges.
To get started, you can adhere to the following regimes. Revolutions are 15t - 18t, working feed (in m/min) is equal to the cutter diameter (in mm), the depth per pass is also equal to the cutter diameter.
The remote control uses something specifically to quickly change the working feed rate during the cutting process. Those. Using the U- and U+ buttons, you change this set during the cutting process, and the real feed speed is calculated as the product of the set by the working feed value specified before starting the NC program (the first line is work speed).
based on the broken cutter I thought so =) I overdid it, you can even feel this step when you insert the cutter =)
now for the main thing i.e. settings - the feed rate that I have on the remote control seems to be shown in mm (2000), but is it in meters - 2 meters/per minute? So, by setting the feed rate to 3000 (when using a 3mm cutter) and increasing the coefficient to 1, I will get that very optimal speed?
for the Y + buttons - thank you =) I’ll try!
wow, how interesting =)
I surprisingly enjoy learning =)
According to the counter cutting strategy, I’ll pick at the artkam =) I think everything will work out =)
It doesn’t matter, at least to the full depth. That's not the point. To avoid burning, raise the feed so that the cutter rubs less and cuts more.
Have you read the lectures on cutting?
off to read =)
OFFLINE yaso73
Yaso73
- Gender: Man
- City Novosibirsk
- Interests: I really like to live. I really don’t like it when people stop me from doing this.
- From:Novosibirsk
I surprisingly enjoy learning =)
It's you who get pleasure from brainwashing. Reading a textbook is much more boring than picking your brains on hackneyed topics.
No wonder they advised you to break it first and then read the instructions. It's more fun that way.
If you are engaged in cutting, then read about how the speeds of working and idle movements are set. Find out how the speed is adjusted on the machine and try cutting in different modes. Be sure to check whether the machine reads the speeds from the G-code or not. If it does, turn it off. Don’t make life difficult for yourself.
I basically came from plywood and wanted to switch to panels because it looks more interesting and tastier! but it won’t be possible to leave completely because... clients are different, requests and needs are also different! And this is why we need to fight somehow!?
In different principles, I and the others, I think, don’t really care what tastes better there and where you are not destined to go.
Therefore: the basics of cutting. For those who have read the textbook and do not lose consciousness at the words “change the speed.”
1. The smaller the diameter of the cutter, the more revolutions. On a 3mm cutter you can cut 24,000, on a 6mm cutter - usually 15-18 thousand rpm.
2. Carbon deposits on the cutter are a consequence of improper operation. It indicates that the cutter has become unusable (or close to it). Not to be confused with resin adhesion when processing resinous rocks. Reasons for the formation of carbon deposits:
a) There are a lot of revolutions, little feed - we “sag” the cutting edge, friction, kirdyk.
b) There are few revolutions, there is a lot of feed - the heat does not have time to leave with the chips, the cutting zone heats up, the cutter breaks (a good option). Bad option: everything that happened before, only the cutter does not break, but continues to work, then ignites the sawdust at the cutting site .If aspiration is connected, he throws the smoldering (burning) pieces into the aspiration. Then - depending on your luck. From a simple bag fire to a volumetric explosion ("daisy mower", stsuko, in the home version).
c) Using a blunt tool, like an elephant’s ass. The results can be obtained as in point “b”. Big bad boom.
d) Less common, but common, is the use of a left-handed rotation tool. It’s especially cool with drills.
e) Processing very resinous rocks without regularly cleaning the cutter from resin.
3. Clean surface treatment - achieved by the correct combination of cutter rotation speed + depth of removal per pass + feed speed.
a) It very much depends on the type of tree. There are types of wood where a clean end can be obtained only due to a small amount of removal per pass (15-20% of the cutter diameter).
b) When cutting plywood, it is better to make the first couple of passes by 0.5-0.7 mm (especially with large-diameter cutters). This will prevent the pile from rising upward when working with a tool with the chips ejected upward.
c) Backlash in the machine and the quality of the cutting tool also influence.
4. Let me NOT agree with my colleague Boatman (about the dependence on the diameter of the cutter when choosing feed and removal per pass).
Everything here is very individual and also depends on the length of the tool. If the cutter is thin and the working surface is 6-10 times larger than the diameter, then there is a tendency to resonances and they break faster.
5. Considering that point 4 is somewhat controversial, it is better to start by removing 50% of the cutter diameter. Of course, the rigidity of the machine, the strength of the spindle, etc. also influences. You can, of course, drive a cutter with a diameter of 20 mm by 40 mm into MDF (or even HDF) and work at a speed of 10 m/min - but this is a completely different spindle power and machine rigidity.
For the case of the topicstarter: drive in different modes, fortunately, there were already tips. Don’t be shy about changing the speed in the process and the spindle speed too. Try it. Pay attention to the chips (especially when cutting a shield). The chips should look like chips. If they only fly dust is something bad and wrong.
If you are smart enough after reading this message to go read the textbook and experiment, and not throw shit here and shout “the amateur is being beaten” and “a forum for sharing knowledge” - I’ll shake your hand. Despite the harshness of the presentation, the message contains the right advice. And the sharpness helps to convert attention to little things that are boring to read in a textbook. Nothing personal.
If the desire to throw shit does arise, you are welcome. You are not the first.
All comments and moralizing are of an exclusively humorous nature. They do not in any way affect the honor and dignity of the interlocutor of the shabby Cat from the window.
Those who help people are wasting their time.
You cannot become famous for good deeds.
ONLINE lkbyysq
Lkbyysq
- Gender: Man
- City: St. Petersburg
- From: St. Petersburg
Dear wise and experienced.
And, although I doubt that the heat generated when cutting wood and rubbing against the material is absorbed by weakly thermally conductive wood shavings, and not by the cutter and then by the spindle, you must obey him.
OFFLINE Lodochnik
Lodochnik
- Gender: Man
- From: Korolev
#38yes, what a rush =) seeing the breadth of the post, I realized that right now I’ll get a lot of necessary information, even taking into account some negativity (I reacted very calmly to the statements =) I’ve already seen your squabbles with the shit throwers xD because I’ve been reading the forum for several weeks (I should choose a machine Mir-Sinsi also helped)), and when I read the post to the moment - “Despite the harshness of the presentation, the message contains the right advice” I thought: they said it in my words (I wanted to start my answer in the same way =)! and I didn’t come here to rush, but to gain experience from experienced masters! I am very grateful to everyone who responded =) the useful information is through the roof! The very first workpiece will be tested =)
In different principles, I and the others, I think, don’t really care what tastes better there and where you are not destined to go.
Therefore: the basics of cutting. For those who have read the textbook and do not lose consciousness at the words “change the speed.”
1. The smaller the diameter of the cutter, the more revolutions. On a 3mm cutter you can cut 24,000, on a 6mm cutter - usually 15-18 thousand rpm.
2. Carbon deposits on the cutter are a consequence of improper operation. It indicates that the cutter has become unusable (or close to it). Not to be confused with resin adhesion when processing resinous rocks. Reasons for the formation of carbon deposits:
a) There are a lot of revolutions, little feed - we “sag” the cutting edge, friction, kirdyk.
b) There are few revolutions, there is a lot of feed - the heat does not have time to leave with the chips, the cutting zone heats up, the cutter breaks (a good option). Bad option: everything that happened before, only the cutter does not break, but continues to work, then ignites the sawdust at the cutting site .If aspiration is connected, he throws the smoldering (burning) pieces into the aspiration. Then - depending on your luck. From a simple bag fire to a volumetric explosion ("daisy mower", stsuko, in the home version).
c) Using a blunt tool, like an elephant’s ass. The results can be obtained as in point “b”. Big bad boom.
d) Less common, but common, is the use of a left-handed rotation tool. It’s especially cool with drills.
e) Processing very resinous rocks without regularly cleaning the cutter from resin.
3. Clean surface treatment - achieved by the correct combination of cutter rotation speed + depth of removal per pass + feed speed.
a) It very much depends on the type of tree. There are types of wood where a clean end can be obtained only due to a small amount of removal per pass (15-20% of the cutter diameter).
b) When cutting plywood, it is better to make the first couple of passes by 0.5-0.7 mm (especially with large-diameter cutters). This will prevent the pile from rising upward when working with a tool with the chips ejected upward.
c) Backlash in the machine and the quality of the cutting tool also influence.
4. Let me NOT agree with my colleague Boatman (about the dependence on the diameter of the cutter when choosing feed and removal per pass).
Everything here is very individual and also depends on the length of the tool. If the cutter is thin and the working surface is 6-10 times larger than the diameter, then there is a tendency to resonances and they break faster.
5. Considering that point 4 is somewhat controversial, it is better to start by removing 50% of the cutter diameter. Of course, the rigidity of the machine, the strength of the spindle, etc. also influences. You can, of course, drive a cutter with a diameter of 20 mm by 40 mm into MDF (or even HDF) and work at a speed of 10 m/min - but this is a completely different spindle power and machine rigidity.
For the case of the topicstarter: drive in different modes, fortunately, there were already tips. Don’t be shy about changing the speed in the process and the spindle speed too. Try it. Pay attention to the chips (especially when cutting a shield). The chips should look like chips. If they only fly dust is something bad and wrong.
If you are smart enough after reading this message to go read the textbook and experiment, and not throw shit here and shout “the amateur is being beaten” and “a forum for sharing knowledge” - I’ll shake your hand. Despite the harshness of the presentation, the message contains the right advice. And the sharpness helps to convert attention to little things that are boring to read in a textbook. Nothing personal.
If the desire to throw shit does arise, you are welcome. You are not the first.
I had a cutter with a long working part of 47 mm, a diameter of 3.175 mm and a relatively small shank, I took it for cutting penoplex (I ended up cutting it myself = (still due to lack of experience) and then I decided to try it on an 18 mm furniture board, it worked for about 10 minutes at a depth per pass of 4 mm (speeds are still the same)Agree. With such ratios of the diameter and length of the working part of the cutter, there really are troubles. I myself have long ago determined these relationships for myself and don’t even think about it now. I mainly use cutters D3.175mm with a working part length of up to 17mm and D6mm up to 22mm.
and I have the remaining 3.175 mm cutters with a working part up to 17mm
And I’ll immediately ask about the cutters:
I still plan to buy cutters in reserve!
I now have, as I said above, TWO-3.175 single-flute compression ones, two single-flute 3.175 with chip removal downwards, one double-flute 3.175 with chip removal at the top (I stopped using it after buying single-flute ones, it seems that it produces more lint) and one 6mm double-flute with with shavings up
I use 6 mm for sampling
3.175 mm for cutting
What do you think I should do? Should we use the same or diversify the fleet of cutters? Three-way or more? maybe corn? I read that it is used for plywood!?
You make practical furniture, decorate interiors, use formwork in construction and you do not have the technical ability to quickly and efficiently process plywood, we have a solution for you, cutting and CNC plywood milling at the RezCenter company. We provide services for shaped cutting, cutting and milling of plywood in Moscow.
We carry out the following milling work on plywood with delivery in Moscow, Moscow region of Russia.
Figure cutting of plywood in our production is carried out on modern CNC milling and engraving machines. These machines can quickly cut full-size sheets of plywood of various thicknesses. If you have a tight deadline and a large volume of milling, cutting plywood on CNC machines will solve this problem. In accordance with your technical specifications, on our equipment it is possible:
- Shaped cutting of plywood;
- Curvilinear and straight cutting of plywood;
- Drilling holes
- Sampling of material
- Chamfering
- Material processing with groove, fillet and shaped cutters
Milling cutting of plywood on CNC machines is the most optimal type for its processing, firstly, a burnt end is not formed as with laser cutting, and secondly, you can quickly cut plywood into straight and curved parts, which is difficult to do with another method, for example, with a hand tool.
Prices for milling plywood, rub/m.p.
| Thickness, mm: | up to 500 | up to 1000 | from 1000 |
| 3-6 | 44 | 35 | 25 |
| 7-10 | 50 | 45 | 30 |
| 12-20 | 60 | 50 | 40 |
| 21-27 | 75 | 70 | 50 |
| from 28 | 90 | 85 | 80 |
Why is it worth ordering milling cutting from our company?
Plywood cutting, is carried out on modern equipment by qualified employees with extensive experience in this field.
When you order plywood milling from us, you receive:
- Optimal prices for services. After reviewing our prices for plywood milling, you will see that they are one of the most profitable in Moscow.
- Fast and accurate calculation according to your technical specifications.
- It is possible to produce a test sample.
- Possibility to save material due to proper optimization of cutting.
- Extensive experience, highly qualified staff and an excellent fleet of machines
- allows you to fulfill serial or non-standard orders in a short time.
- High precision milling, our equipment allows you to process material with an accuracy of 0.1 mm.
- Possibility of milling our plywood.
- We carry out urgent and small orders at no extra charge.
- We deliver finished products throughout Moscow and the Moscow region
- Friendly service.
We accept and calculate orders according to the following requirements:
- Drawings in vector format such as dwg, dxf, cdr or ai, such programs as AutoCAD, Corel DRAW or Adobe Illustrator, PDF
- Exclusively 2D, 2.5D
- Scale 1:1
- Dimensions in millimeters
- Raster images are permitted for supporting information only.
- All curves are closed, without intersections, overlapping vectors, etc.
- All objects and fonts in curves
We are professionals in our field and it is very profitable to cooperate with us!
- We promptly fulfill all orders
- We provide favorable prices for services
- We minimize the cost of materials
- We advise on any questions
- If necessary, we pack and label your parts
- We work from 9.00 to 19.00 five days a week
- We accept your orders 7 days a week
Our works
 |
 |
 |
||||
 |
 |
 |
A little about the material itself
Plywood is a versatile, fairly durable material made by gluing wood veneer. Due to impregnation, plywood is resistant to the external environment, its weight is approximately equal to wood, but at the same time it has increased strength and moisture resistance. The popularity of the material is primarily due to its low price, large assortment of formats and thicknesses, and the possibility of application in various fields of activity.
Plywood is easy to cut and machine. Processing methods include milling, laser cutting, drilling, grinding, etc.
Properties and types of plywood
Plywood is classified:
- by purpose - construction, furniture, packaging, etc.;
- type of wood used for manufacturing (coniferous or birch);
- moisture resistance;
- for impregnation (FSF, FC, FSF-TG non-flammable, FB, etc.);
- by variety
Sheets have a thickness from 3 to 40 mm and are available in various formats 1525x1525, 2440x1220, 2500x1250, 1500x3000 and 3050x1525mm.
The grade corresponds to the quality of raw materials used in the production of plywood. Depending on the number of flaws on the visible layers of veneer, it is divided into highest or elite, I, II, III and IV grades. Regulated according to GOST 3916.1-96. The grade is usually indicated on the ends of the sheets. For example, II/II shows that visible plywood veneer sheets, on the back and front sides, correspond to the second grade for which the presence of pin knots and up to 8 wood inserts per 1m2 is allowed.
Briefly about the features of CNC milling of plywood
Milling plywood has a number of distinctive features.
- Plywood is easy to process. To prevent the formation of lint and scuffing on visible layers of plywood, it is necessary to strictly follow the processing regimes. It is also worth paying attention to the choice of cutters. When processing thin plywood, it is advisable to use a vacuum clamp.
Plywood milling is a technological operation for cutting a sheet into straight and curved parts of the required size. All work is carried out on modern milling machines with numerical control, which provide the ability to cut out parts with complex contours with high precision, carry out sampling and drill holes.
In our work for cutting plywood, we mainly use carbide compression double-flush cutters, which allow us to achieve a clean cut and, as a result, reduce or completely eliminate the need for additional grinding of finished products.
An important point is that counter-milling of plywood in many cases allows you to avoid defects during cutting. Optimally selected modes allow you to maintain sharpening of the tool and, as a result, obtain a better quality cut.
Please note an important point - the quality of milling directly depends on the type and condition of the plywood. High-quality plywood, as a rule, mills better than plywood made from lower-quality raw materials. Excessive moisture in plywood can also affect the quality of the cut. During the milling process of such plywood, pile, chips and scuffs may appear at the ends of the parts.
Our company is equipped with high-quality and modern equipment that allows us to quickly and efficiently perform complex cutting and milling of plywood. The working field size of our machines is 2030x4030, which allows us to mill plywood of any format.
Our use of programs for laying out parts ensures optimal cutting of plywood sheets in order to maximize material savings, so ordering plywood milling from us is the right and profitable decision.
Who are our clients?
Prompt and high quality milling work on plywood are popular with:
- Manufacturers of POS materials
- Designers and decorators
- Furniture manufacturers who do not have their own plywood milling machines.
- Construction companies
Where is plywood milling and cutting used??
- In furniture production;
- In the construction industry;
- Shipbuilding, auto and carriage building;
- As packaging;